I first heard of Gyotaku a couple of years ago. The only problem is I could not remember the
name or how it was spelled since I am not fluent in Japanese. I was mainly interested in it because of what
it was; a unique and artful way to display and memorialize a great fishing
experience.
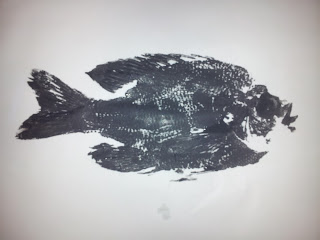
In Japanese, ‘gyo’ means fish and ‘taku’ means rubbing. Hence, gyotaku is a ‘rubbing of a fish’. I thought it was great because it is
something you can do yourself and it is inexpensive to create. This also makes it the perfect creation for
the little one’s first fish.
The first step in creating a Gyotaku print is to catch a
fish. Since my new year has not been all
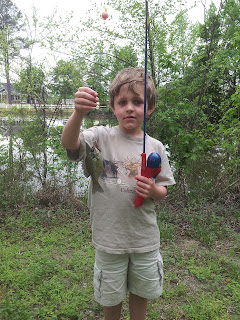
that kind to me, I had to enlist help for this part. My now eight year old son Cooper provided the
ideal fishing partner. It was just two
years ago that he brought in his first fish.
Each time we go out, he always finishes on top with the number brought
in. I am not sure if it is because he is
just that much better than me or if it has to do with my time is being used to
bait his hook, help him cast, help get his hook loose from a limb when he
decides he can cast the bait better, or just witnessing his youth and awe of
nature. Either way, I am happy to assist
in his success.
For this story, the fishing started out a little slow. We fished with some Canadian nightcrawlers on
a small #8 hook with a cork bobber. I
had a spot picked out under a bridge just in case it rained. Funny thing about that spot; there was more
traffic under the bridge than on top where the road was. In a space of a few hundred feet, we had
acquired no less than twelve different anglers using a variety of tackle.
None of which had so
much as a pretend bite.
I convinced Cooper to let’s head to another location and try
our luck. It did take some
convincing. As much as he likes to fish,
he really, really gets bored if nothing is taking the line.
 So we ended up at an old fishing hole I knew about and
threaded another nightcrawler. By the
way, the nightcrawler farm had the best catch phrase for their bait. “Our worms catch more fish, or they’ll die
trying!”
It did not take long before Cooper brought in his first
fish. A small bluegill that was too
small for the project. A little later,
he brought in a beautiful pumpkinseed.
He liked the name of the species and started figuring out why it carried
such a moniker.
I made one last cast and left the line alone as we packed up
everything. After loading the truck
Cooper asked where my rod was. I told
him and we walked over to where I had it sitting. However, it was no longer standing up. It was now flat on the ground twitching. I finally caught a fish! We had a short fight with the monster bream
(well, average sized bream for most people) and we both laughed now that the
slump was over. He would work great for
the Gyotaku print as well as provide a small meal.
Part two of the print is the preparation of the fish. You want to clean and dry the fish
completely. Use dish detergent or
vinegar in the cleaning to help kill any bacteria. After washing, take paper towels and pat
dry. Pay special attention to the gill
area and other openings. Push the paper
towels up into those areas to dry as well.
Flare the fins and use something underneath them if necessary to keep
them flat.
For part three, there are several options. This is where the actual printing process
will start. Take a paint, it can be
anything from a water color, to an oil base, to an acrylic, and brush the fish
with it. For fish that are multicolored
or fade from one color to a lighter version, you can brush with different mixed
paints as well to simulate the actual colors.
For our print, we used a non-toxic paint since Cooper was involved.
Now we get to the ‘taku’ part of the print. Gyotaku was originally invented in the mid
1800’s as a way for Japanese fishermen to show the size of their prized
catches. Rice paper has historically
been the medium for the prints as it is light weight and flexible enough to
reach all the contours of the fish. We
did our print a little different but I will explain the process first.
Take the paper and lay over the fish. Begin rubbing the paper onto the fish so the
details of the scales are seen. Be sure
to press the paper into the fins in order to get a good print as well. On our particular catch, we placed the fish
on a piece of canvas and approached the rubbing from the opposite way, pressing
the fish instead of the paper.
When completed, it makes an excellent display. And if used for your kid’s or grandkid’s
first fish, it will also make a treasured heirloom. You can repaint the fish to make a few other
prints to share with grandparents and loved ones as well.


Good story. You got style. I'd love to know why you call it a Canadian night crawler? and not a dew worm ...? which is what we call them up here in Canada.
ReplyDeleteThis is great, now I need to take my granddaughter and get her to catch her first fish
ReplyDeleteThanks so much for sharing this nifty idea! I think I am going to incorporate it into some upcoming youth fishing events and excursions!
ReplyDeleteYou're not "affluent" in Japanese, eh? Fluent is the word, bud.
ReplyDelete